Thursday, February 28, 2013

How to Hang a Massive photo wall

Okay folks, here we go.

If you want ideas about how to plan and hang a basic gallery-style wall, you can check out this old post.  If you want a little inspiration, you can check out walls I have done here, here, here, here, and here.  And some other people's art walls that I have blogged about here, here, here, and here.

Today we are assuming you're in it to win it, and talking the logistics of actually planning and hanging it all up.  There are lots, so settle in!

1. Determine your outlines
First you need to decide exactly where you're going to work.  Not jut which wall, but where ON the wall.  No matter what, you want your arrangement to relate deliberately to your architecture.  In this case, we chose the long wall of the conference room, visible from the office entry.  The adjacent wall has a wall-to-wall window, and we decided to create a wide band that basically followed its path.  (I can't believe I don't have a picture of that!)  To create the outline, I measured down from the ceiling to the top of the window, then took that same measurement along the picture wall, and taped a straight (enough) line across with painter's tape.  Then I measured down from that line and taped the bottom edge in line with the bottom of the window, all the way across.


2. Create an organizing principle
Generally, a large group of photos or artworks are going to tell some kind of story.  Your job is to author the story, as it were.  In this case, my job was easy: as all the photos were of one family, we created a chronology.  Since we had a horizontal band, it naturally "reads" as a timeline from left to right.

Once you have your concept, you can decide on frames.  Do you want to unify, or divide, your subjects?  Do you want to call more attention to some subjects than others?  To unify, use matching frames.  To call special attention to one image or work, use a different color, weight, or size of frame.

3.  Divide the space
This is not strictly necessary, but it sure helps, both in keeping organized and in creating a grid to work within as you start to hang things up.  Here I used two pairs of portraits of the patriarch and matriarch, early in their marriage and later in their lives.  (The photos are being worked on, so they aren't actually in the frame yet!  They will also get oval mats to further set them apart.)  Using larger frames and a pair of sconces helps to visually break up a big expanse.  (Mirrors would work, too, or inserting circles or ovals into a field of squares and rectangles.  You get the idea.)


This also helped me in organizing the photographs in to sections.  The far left became pre-marriage, marriage, and life with their first children; the middle is the entire family into young adulthood; the right section features the next generation.

To further delineate the middle section, we chose portraits of each of the five children and printed 5x7s, just slightly larger than the rest of the photos, which are all 4x6.


4. Lay it out
Clear the floor!  It's time to lay it all out.  Even if you have followed all the steps above, there is still organizing work to do.  When I was in the early stages of planning this wall, I considered several options for arrangement.  Once I divided the space with the portraits, my left over space pretty much dictated that the rest of the pictures would fall in to columns around them.


If you are working with photography in frames and need to edit your photos down anyway, you have some flexibility to plan your frame layout first, and then choose the photos to go in to the layout.  But be prepared to change!  I had a layout that I was happy with that had a ton of horizontal frames, only to discover we had more vertical photos.

5.  Prep your frames
This is a step that takes a tremendous amount of time, and people don't realize it.  Again, this applies only when you are framing things yourself.  You need to open up the frame, center the photo, tape it in place, and clean the mat and glass, then carefully reassemble it all.  I mean, you don't have to, but it's kind of a shame to skip it when you're doing all this work.

You will want:


I have always just used paper towels and spray glass cleaner in the past, but it was slow going, and we discovered that lint-free microfiber cloths do a bang-up job on the mats, and glass wipes are far superior to spray for the glass.  You'll thank me for this.  (Or, actually, thank my aunt, who figured this out!)  As for the tape dispenser, you really just need something you can use one-handed; disposable plastic dispensers just don't work.

6. Start to hang
Here's where dividing the space really comes in handy!  where do you start with a project of this size?  Well, in this case, you start with the sconces and the large frames that create the division in the overall project. Then the portraits.
It is critical that you get this spacing right.  Mess up now, and you will be putting a LOT of extra holes in the wall.  With such a wide expanse (my wall was 25' long), tape measures get finicky and the math gets complicated.  I had to re-hang several of these portraits to get it just right.  You can see here that the spacing was off at first:


(Oh, hey, if you look at the left side of the picture, you can see the corner of that window I mentioned.)

To get hanging, you will want:


Okay, duh, you also need a hammer and nails or picture hooks.  

With each picture, use a SMALL and lightweight tape measure to measure your placement and mark the top center of the frame on the wall. Then measure down the back of the frame from the top of the molding to the bottom of the hook, then measure that distance from your mark on the wall, mark with the pencil, hang the frame.  Add small dots of blue stik or other sticky adhesive to the back of the bottom corners.  Use a hand-held level to straighten the frame, then press gently until the blue stik adhered.  This may sound like extra work, but it's worth it: If each frame is level as you go, you have a stable reference point to work from as you hang more frames around it.  One wonky frame can have a ripple effect through the whole wall.

7. Do the math
With a grid like this (or even just columns), hanging the rest of the frames is simple math.  For example, a column of 5 frames in a row will have even spacing--say 1 inch apart.  So measure the frame from hook to molding, add the 1" (or whatever specified space), then measure that distance down from the existing frame on the wall, and place your hook.  Works the same horizontally.

8. When in doubt, level it out.
Yeah, I just wrote that.  Do you see how long this post is?  A trick in keeping a column straight.  Do the math as above for the vertical spacing.  Then, to be sure the frames will line up side to side, use a level to ensure that the hooks are in a vertical line.  Does that make sense?  So, hang one hook, hang the picture.  Then do the matht o place the hook for the picture below it.  Now take the first picture back down, and before you hammer in the second hook, use a long level to line up the existing nail with the spot you have marked for the new nail.  You may need to adjust a bit to the left or right.

8.  Fill it in!


I'm not going to lie: this was a pretty big undertaking.  Once we had our general plan and had all of our supplies on site, it took a couple of hours to lay it all out, finalize the arrangement, and edit the photos.  Then it took about twelve hours to prep and hang it all.  And that was me and another person.

So there you have it.  I'll show you again when the sconces are installed and the proper portraits are in the large frames.  Maybe I'll even use a real camera, and show you the rest of the office, too.

If any of the details don't make sense, or if I need to make drawings to explain the math of it, just let me know! 


Wednesday, February 27, 2013

Progress on the TV art

One of the nice things about projects in your own home is the freedom to experiment on-site.  You don't have to have it all figured out before you start the install.

I mentioned a while back that I wanted to install a giant canvas over my TV, partly to hide the thing when not in use (and perhaps reduce the TV watching that I am engaging in), but mostly to make the room feel more finished most of the time.

I figured out the scale I wanted, my husband built a frame, and I covered it in inexpensive painters canvas (from here) with my staple gun, and hung it on up.  By which I mean I put the cross brace on the back of the frame right on top of the TV.


Without the TV visible and acting as a reference point, I noticed that the canvas feels a bit low.  So there's that.  Especially in relationship to the vertical stack of stamp art on the same wall.


See?  So it will move up, probably with some blocks added to the cross-brace in the back. Speaking of which, I noticed that whatever wood sits directly on the TV will need to be covered in felt, pronto.  No need to scratch up a perfectly good TV.

Before I started painting, I wanted to test out some ideas.  Do not judge what you are about to see.  Since I am thinking about a black and white abstract,  I got out all the black construction paper form my kids' pack and started taping it to the canvas in a sort of geometric way.


The idea is just to mock up the general gist of it to see how it plays in the room and how it relates to the other art and furniture.  I left it up for a day or two to see how I reacted to it as I moved through the house.


(By the way, do you like our state of the art stereo system?  I think my husband got that boom box in the 80s.  It's great for my 4 year old, who loves to play DJ.)

The verdict?  The bold black geometric pulls too much focus.  It grabbed my eye any time I went remotely near.  I'm thinking it needs to be more organic (the geometry mimics the frame stack too much), and medium to large scale (the framed paper is small scale, loose, and busy).  It needs to be a little more delicate, either in color or in line.  Another mock up is in my future.

An important note.  Generally, I would not recommend planning a painting this way.  No, sir.  Art should be art, and should not be "decor."  But in this case, it is a major statement in the space but also the last piece coming in to the room and I don't have any money to buy real art right now, so it makes sense to do something myself and plan it to the room.

Very process-y, right?  I hope it helps to see the thinking process, and to show that, while sometimes things just "work," more often there is a lot of planning and playing that goes in to each design decision along the way.

Tuesday, February 26, 2013

Because this needs to happen

I posted a little late yesterday, so most of you may not have seen that I am selling the girls' curtains.

Why, you ask?

Oh, because this needs to happen.


Don't you think?

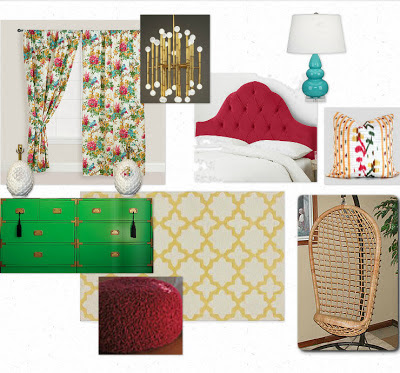
I had a completely different scheme in mind for the girls (maybe I'll show you that another day), but then I brought one of these world market curtain panels home for a client and bam!  Vision.

This dresser goes kelly green.  This light (finally) gets hung.  Yellow pineapple lamps go white.  Headboards may or may not get reshaped and/or tufted.  This pillow finds a new home.  Existing gourd lamp, swing chair, and pouf.

Of course the thing that sent the dominos falling (again) was the need for a rug, and when I spotted the yellow and cream moroccan tile wool rug on rugsusa for 50% off on the same day I fell hard for the curtains?  Well, sometimes it all just comes together.

(If I like it all in person--isn't that the kicker??!!)

So.  Know someone who would like to buy the existing curtains?  Email me.

Monday, February 25, 2013

For Sale

The girls' room was one of the first ones I finished in this house.

Only, it never felt done, and I kept making changes.  As the rest of the house comes together, somehow their room is the one that feels like it doesn't quite fit in.  For months I have thought about changing it.  Well, I'm going to go for it.  I'll tell you all about it.  But first, I offer up their curtains for sale!


I love these curtains.  LOVE them.  But I also think they're the thing throwing me off in here.  Almost my palette, but not quite.

It is a braemore fabric which retails through Kravet for $77/yard though I got it for less.  Here's a shot of the print:


Details
Curtains are 86" single-width panels with a pole-pocket top and a proper 4-inch hem.  They are unlined, but a nice heavy weight cotton.  The fringe is sewn to the surface (not in to the side seam) and can therefore stay or be removed.


Asking $200 for the pair or best offer (comparable to panels from, say, Pottery Barn)

If you are local to the Twin Cities and interested, the cornice board is about 81 long x15 tall.  It is upholstered on the front, but the back is unfinished/ unlined.  I can finish it for you if you want.  It is a plywood base and fairly heavy.  Asking $50 unlined/unfinished,  $100 lined.  You can see that the pattern does not match perfectly at the seam--since I was making them for my self, I got a little lazy.  :)


They worked when the room was sort of preppy, with plaid blankets, matellase shams, and pineapple lamps (and these botanicals, borrowed from the pattern!):


And continued to work as it got a little bolder/more bohemian:


If I was starting with them from scratch, this is what I might do:


Sort of modern woodland, with a faux bois rug, iron bed, tree cookie side tables, and healthy doses of crisp black and white.

Email me if you are interested.  Thanks for looking!


Saturday, February 23, 2013

Thursday, February 21, 2013

The largest art wall ever told


Well, I did it.  I hung my biggest gallery wall to date.  At 89 frames, it actually worked out to be a little smaller than I expected.  (Those paper cutouts are mock ups of these backordered sconces.)

But still.

Between this extravaganza, staging a 5500 square foot house last week, meeting with two new clients this week, and starting install on this project, I am plum tuckered out.

I think I'll take a long weekend, and give you all my best staging secrets AND gallery wall hanging tips next week.

Meet you back here.  Deal?

Tuesday, February 19, 2013

Canopy Coloring Sheets

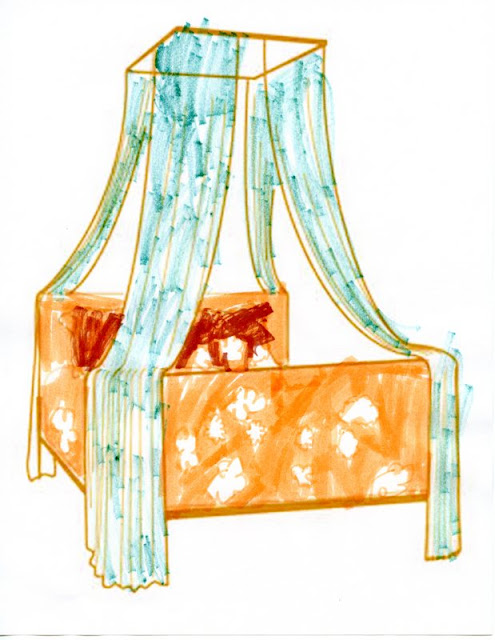
So, you know how my 4-year-old requested bed curtains for Christmas, and was oh-so-let-down by the Ikea netting I got in lieu of sewing custom something-or-others in the days before the holiday?

Well, I was curious what she really wanted.  Not that I'm going to go changing it any time soon, mind you.  But it amazes me what specific ideas children have, and I wanted to know more.

I recently spotted this site, chock full of hardware for every canopy under the sun, on Lindsay's blog.  Because the site won't let me pin these excellent illustrations, I have done what any middle-aged tech repressed mom designer would do: I left the tab open for a couple of weeks.  When I was cleaning out my tabs today, I called the four year old over and asked her what she had really wanted when she requested curtains for her bed.


Photobucket


She basically chose them all.  I think she got a little distracted by all the options (welcome to my world.)  All of a sudden, instead of telling me what she had meant, she was instead telling me what she would like now.

And then she had a brilliant idea.

"Mom."  she said.  "Can I color those?"

And the home decorator coloring sheets were born.

Witness.


Don't you love that she created her own patterned fabric?  I love the orange and white silhouette floral, and really can't get over that porter-teleo style swirl on the melon colored curtain.  Not to mention the block-print quilt and trimmed out bolsters under the green canopy.  Love.

I would make you some free printables or whatever, but if I figured out how to print these out, so can you.

And if you gorwn-ups want to use them yourselves?  Well, I won't judge.

Monday, February 18, 2013

Craving: Yellow


When I was a kid, my mom allowed me to choose the paint color in my room.  At the tender age of 4 or 5, I chose yellow.  I remember how bright that room was when the sun came pouring in, and the good feeling that it gave me.  Over the years, I have used yellow in my own home in many different ways, and it seems to show up as an accent in my client's spaces on the regular, too.


Source: google.com via Heather on Pinterest


But finding items in just the right shade can be tricky, as manufacturers follow trends, and for the last few years we've seen a ton of chartreuse and citron.  (Another favorite of mine, so I am not complaining!)  A client was particularly craving yellow recently but every single throw pillow and lamp seemed to have a green undertone.  As spring catalogs come my way, I'm noticing a reversal: today's yellow is becoming more clear: lemon or sunshine, or even leaning to the orange: marigold.  (Also quite a lot of butter, but that pale shade leaves me a little cold.)

Using all the yellow items I have saved to olioboard, I thought I would make a simple little round up.  But then I did that thing where I took an easy thing and made it hard: I set off on the search for every yellow thing under the sun (pun intended).  It overflowed into, well, LOTS of boards.

Accent Furniture


Lighting


Seating


Textiles

Etc.


So much sunshine for this very grey Minnesota winter day!

Oh, sources, you say?  That might take a little while....stay tuned, or leave me a note if there is something you must know about.

Check out yellow in some of my old design boards for various clients: living room, living roomdining room, girls' shared room, girls' room, 9-year-old girls' room, plus boards just for fun, like the mixed-gender kids rooms or the floral bedspread 2 1/2 ways.

Tell me: do you love yellow, too?

Saturday, February 16, 2013

Small Measures


I'll tell you: this week was a doozy!
Lots to share if I ever find the time.  :)

For now, art walls may not be new, but this one, with it's excellent use of shape and negative space, is purely inspirational.  Go forth and hang art!

Tuesday, February 12, 2013

Nate hits clearance

I have to admit, I have been stalking the end caps at Target, waiting for the Nate Berkus Home collection to hit clearance.  I am such a fan of his elegant-masculine-traveled aesthetic, but I didn't really "need" any accessories for my home.  (I did use several items from his collection in this project, which needs to be properly photographed and shared.)


But.  I am staging a house this week, and while I made a clean sweep of Target's clearance throw pillows in my client's color palette, I also picked up a few things for myself.  I am loving Nate's little hammered brass bowl on the side table above.  For $7, I think I can justify it.  It is empty now, but it will be filled in about 30 seconds with a collection of painted rocks, shells, my mom's old clip-on earring, squinkies, or whatever else my girls are treasuring these days.  In fact, my four-year-old's eyes lit up when she asked "is that for US?"

Money well spent.

Saturday, February 9, 2013

Small Measures


Two words: Rainbow dresser!

The perfect antidote to all this winter.

Friday, February 8, 2013

Where you'll find me


Remember this?

Well.  It has been quite a project.  Approximately 38 frames up, approximately 60 to go!
I have done a lot of gallery-style walls, but this one required a good deal of planning.  I will do a how-to next week.  Today, I will put a lot of holes in that wall!

Have a great weekend!

Heather

LinkWithin

Related Posts Plugin for WordPress, Blogger...