Tuesday, July 31, 2012

Easy peasy canopies (and a giveaway)

Doesn't that make you want to say "can-o-peasies?"  Or is it just me?


I've been staging a house.  The owners are adorable and have made a ton of great choices, like painting out the upper half story white (it was knotty pine) and installing white flooring, thereby making the long narrow room as expansive as possible.  (Also creating ombre stairs to that space, as shared here.)  But, they have been living in 1100 square feet with their two kids, two dogs, and two guinea pigs for long enough that they started to lose perspective.  It happens.

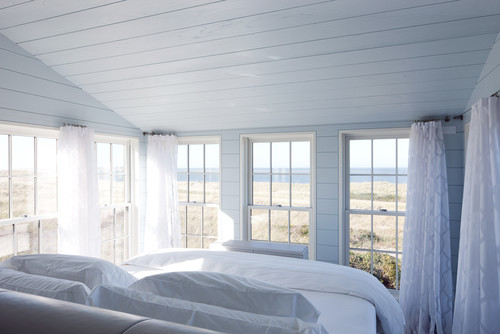
After lots of clearing out and refocusing rooms, the house is looking great and will be on the market soon.  My favorite change?  To make the most of the sloped ceiling upstairs and mask some odd doors and built in nooks in the walls, we made a pair of canopies from inexpensive fabric.


Cute, yes?

The best part?  We put them up with velcro.  Quick directions (if you sew):

-hem the bottom 4 inches
- put in 1 1/2 inch hems on both sides
- put in a 3 each hem at the top
- get some velcro for decor projects.  This kind has adhesive on one side and you sew on the other.
- adhere the sticky side to the place where the wall meets the ceiling and where the half wall meets the straight wall.  (Allow 24 hours to fully cure).
- sew velcro to the top of your panel
- put your panel up at the top, drape to determine how much fullness you want (we did not want a a lot), and pin in two spots across the fabric where the second strip of velcro will go
- sew in second strip of velcro

Alternately, you could use a pre-made curtain panel and just sew the rod pocket closed on the sides to avoid sagging.  Easy!

Hey, you know what else?  A little GIVEAWAY today.

Shabby Apple is offering a $50 gift card to the winner.  Check out their adorable, vintage-inspired line on their website.  To enter, do any of the following, then leave me one comment here for each action (and while your at it, tell me your favorite item from  Shabby Apple):

- Check out the Shabby Apple facebook page
- Follow this blog (see "followers" in the sidebar?)
- Share this post on facebook or recommend on Google+
- Tweet this page

You must have a valid US address to enter.

If I won the gift card?  I would choose this skirt:

Close this window

Stripes!  Shocking, I know.


Monday, July 30, 2012

Taking the plunge

When we bought this house two years ago, the very first thing I knew I wanted to do was to paint the fireplace wall black.  The fireplace is a gas insert that was placed strangely in the wall, with no surround of an kind.  Painting the wall black will make the fireplace disappear but also create a focal wall.


Then we moved in and I chickened out.  Or, rather, became completely indecisive.  I know I would tell a client to do it, though I acknowledge that it is a risk.  For me, the question is not one of color: though dramatic, black will make sense.  The question is one of texture: paint is so flat, and while that look works for the architecture of the house, it is less in synch with my layered style, and black grasscloth is currently out of the budget.

So I pinned a million pins.  There are a lot of black accent walls on pinterest.  Here are some of the ones most convincing to me.


Source: flickr.com via Heather on Pinterest


I will tell you this much: I bought a quart of black paint, a dragging brush, and some metallic glaze. I am thinking about painting the wall flat black then experimenting OFF the wall with different paint techniques for adding texture.

We'll see how this goes...!

Oh, P.S. I'll have a little giveaway tomorrow.


Saturday, July 28, 2012

Small Measures


Framed photo collage. Works so well in a room so lovely and balanced.  Let the random photos be the only chaos.

Friday, July 27, 2012

Gold leaf tole sconces

My grandmother had good taste and a very talented decorator. She passed away when I was 13, but her style had made a lasting impact on me. When I moved to my first apartment in Brooklyn, I visited the "free store" in my Grandfather's basement and, among other things, came away with a pair of gold leafed tole wall candelabra. I had a vision for an all-white apartment and planned to spray paint them white.


Luckily, I came to my senses (with a little input from my mother), and they ended up happily ensconced in a sort of pea green dining room with picture moldings, vintage Queen Ann furniture, tortoise blinds, and, for special occasions, massive amounts of forsythia branches.  (Man, do I wish I had had a digital camera then!)


Our next two homes didn't have a spot for them, and they have been in storage for over a decade.  Recently I have been making an effort to get all my cool stuff out of boxes and in to the house, where they can make me happy.


At the same time, I've noticed that ornate gilded wall sconces are trending. If there's a lot of it out in the vintage stores, it is making a comeback: mark my words! I saw a bunch for sale yesterday at  Hunt and Gather.  And I just spotted these over at Chattafabulous (from New York Social Diary):


My grandmother used hers in a living room with acres of kelly green carpet and all-white, low profile, button back upholstered furniture.  Gorgeous.

What do you think: do you like the look?

Thursday, July 26, 2012

Smokin Sheets and Shams part 2

More options for making a pretty bed without a pile of pillows.  (the first thirty, here.)
Mix and match shams, plus a single accent pillow, and voila.

Lots of florals and polka dots today.  Fun!

Bold

Top row: Left, middle, right
Second row: Left, middle, right
Third row: Left, middle, right
Fourth row: Left, middle, right (polka dot is similar--the one shown here just sold out)
Bottom row: Left, middle, right

Ethnics plus Geometrics


Top row: Left, middle, right
Second row: Left, middle, right
Third row: Left, middle, right
Fourth row: Left, middle, right
Bottom row: Left, middle, right

Feminine


Top row: Left, middle, right
Second row: Left, middle, right
Third row: Left, middle, right
Fourth row: Left, middle, right
Bottom row: Left, middle, right

As usual, I wish I had done the research first, bought my own new pillowcases second!  I kind of want to re-make all the beds.  But it will have to wait.

Wednesday, July 25, 2012

Sixty Smokin Sheets and Shams to Mix and Match

Yesterday I mentioned my preferred formula for a pretty and practical bed:

Sheet set pillowcases + pretty shams + one decorative pillow (of any size or shape) = easy peasy lemon squeezy (as my 6 year old is fond of saying).

I rounded up a ton of excellent options and went to town mixing an matching.  To mix your patterns, try one of these rules:

Big print + small print + textured or Wild print + geometric print + structured. 

Let's start with the most fun, shall we?


Whimsical
(I've grouped them in rows, with the accent pillow on the right)

Top row: Left, right
Second row, Left, middle, right
Third row: Left, middle, right
Fourth row: Left, middle, right
Fifth row: Left, middle, right

Bold
Top row: Left, middle, right
Second row: Left, middle, right
Third row: Left, middle, right
Fourth row: Left, middle, right
Fifth row: Left, middle, right

Sophisticated

Top row: Left, middle, right
Second row: Left, middle, right
Third row: Left, middle, right
Fourth row: Left, middle, right
Fifth row: Left, middle, right


Tomorrow, I'll be back with 30 more.
Any favorites from this batch?

Pssst.  I should, perhaps, mention that plenty of these have not been seen by my own two peepers.  I make no promises that colors will go in real life as nicely as they do on screen.


Tuesday, July 24, 2012

Making a pretty bed without a pile of pillows


I'm sensing a pillow backlash.

I've heard a lot of complaints lately about the impracticality of extra pillows on a bed (some of them, yes, from my husband).  Apparently people no longer want to go to the trouble of swapping out the "pretty" pillows for the "real" pillows, and I get it: you might want to use your underbed storage to store something other than decorative pillow forms.

At the same time, we want our beds to look nice, yes?


I have a simple solution: pretty pillow cases and useable shams.  My favorite formula is to use two standard pillows on each side of the bed (or king pillows on a king bed), with a single decorative pillow in front.

Pillow cases are both less expensive than other bedding and tend to wear out faster, needing more frequent replacement.  If you keep your bedding neutral and have fun with the shams and cases, you can make over your room as often as you want without breaking the bank.


The key? Choose pillowcases you can actually sleep on and that wash easily. Buy a couple of sets to mix and match. I actually have a bunch of sets that can mostly all go in any bedroom in my house, giving me endless possibilities.


I've been digging up tons of great options, and will share a bunch of combos all week long. Next in the series of "amazing and afforable" round ups.


What do you think: do you keep it simple with your bed pillows?

Monday, July 23, 2012

Garden Dreaming


I'm not much of a garden gal.  Just not really interested in them.  Luckily, in all three of my homes that have had outdoor space, the previous owners have done a nice job with the landscaping, and I haven't had to think much about it.

Yesterday I spent a morning playdate in a completely magical garden at an urban home in NE Minneapolis.  All of a sudden, plantings got my interest: what was this ground cover?  How many of the plantings were perennial?  How did you make that secret hideout under an arbor?

And just like that, I'm taking an interest in my outdoor space.  If nothing else, I wanted to understand why I never want to be in my yard and never wanted to leave our friends'.

Naturally, I started in on google image searches, using terms like "secret garden" (too much book/movie reference), "hidden gardens" (it is, apprently, a thing in Amsterdam), and "magical gardens."  I pinned away, and discovered a few things that float my boat:

Arbors and overgrown garden doors

Source: penick.net via Heather on Pinterest


Ground cover surrounding haphazard paths


A dining area with a sense of intimacy

Source: google.com via Heather on Pinterest


Coneflowers


Wild stuff, contained


Now, many of these gardens feel lush, overgrown, European.  And our house is pretty angular and modern and TALL.  The challenge in our back yard is a feeling of exposure.  Despite a tall, wood privacy fence and an overall small scale, the space has no sense of intimacy, and--big problem--no shade.  We were planning to add built in benches to the deck for a dining are, but I think I'll ruminate on all of this for a while.

Anyone have favorite garden blogs, inspiration, or ideas?  I would love your input!

Saturday, July 21, 2012

Small Measures


Snapshots installed as a heart. Cute as can be, and done in an hour!

Friday, July 20, 2012

Evolution of a boy's room

Remember this little boy's room?

Here's the final design board.


The original rug was one they had--but when they hauled it up to the room, it was too thick to get the door open!  So with chartreuse out of the picture we went for a bold wall map (actually an inexpensive one from Pottery Barn kids) and grounded the floor with a grey rug, picking up the charcoal stripe in the zig zag chair.

Can't wait to see it all come together in the space!

Thursday, July 19, 2012

2-tone chairs in action

I love receiving dispatches from afar!
Just got this snapshot of a client's dining room in progress.


We had been waiting on the custom chairs.  (I shared some two-tone chair inspiration, here.)  Loving the mix of rustic and refined, and all those curves.  What do you think?

Wednesday, July 18, 2012

Faking the custom touches

Installing at a client's the other day, I was struck by how much custom details really can make a space--even if you have to fake it.


Now, there is nothing groundbreaking here, it's just a pretty room in a traditional style.  But it is a good example of how you can customize retail items to look custom, giving you a more personal and polished end result.

The bedding is all retail--pottery barn duvet and shams and a Martha Stewart bedskirt--but we customized the skirt with pleated grosgrain ribbon trim and will add a euro square in a gorgeous designer fabric.  Those two little details take this bed out of the catalog.

Similarly, the Pottery Barn draperies are silk, but were on sale, and I had my workroom pinch pleat the tops, giving me custom-look lined drapes for a LOT less.  We splurged on custom bamboo blinds (when you buy them from Home Depot or Target they may be the correct width but are never the right length), and cut to order curtain rods--much more substantial and finished looking that a skinny telescoping rod from a big box store.

We're not quite finished, but if you take a look at the before you can see just how far we have come!


Monday, July 16, 2012

Making the most of

I've been tossing around this idea for a feature called "making the most of..." to show how you can maximize something potentially awkward and make it totally awesome. I recently found this pink and green room--a presumed "before" picture to this lavender room I have shown before from Katie Rosenfeld--and it really hit home this idea for me.

The before room is sweet and lovely.


The after not only tolerates the low ceiling, but makes the most of it. The layout is exactly the same, but the impact of the second room is just exponentially more. Using stripes to emphasize the sloped ceiling (rather than ignoring it), plus installing a window treatment with more presence takes the room to the next level.

Anything awkward you want to make awesome in your own home? Send me a picture and we'll talk.

Saturday, July 14, 2012

Small Measures


hgtv Design Star

Painted lampshade.  Are you watching design star?  This is not a new idea, but I liked the way Britany taped off random stripes to incorporate yellow.  Did you see that desinsponge is having a painter's tape DIY contest?  Details here.

Friday, July 13, 2012

Instead of a giant curtain rod


Curtain hardware can be expensive, especially if you have a very large bank of windows requiring and extra long rod.  I recently did a consultation with a woman with exactly this issue.  Her apartment has a lovely bank of windows looking out into the trees, making it feel a bit like living in a treehouse (and who doesn't love that?)

While the room needed softening, the windows did not need functional panels.  Instead of shelling out for a jumbo rod, I suggested that she buy two smaller, less expensive ones instead.

(The more I pair "rod" with various synonyms for "large," the dirtier it sounds.)

I happened upon this photo from a Sneak Peek on Designsponge that shows the prettiest way to do this.


The key here is that the curtain does not completely fill the rod.  That extra foot or so gives it all a little breathing room.  Plus, making sure the rod is visible makes certain that your curtains don't look like they are growing out of your ceiling.

Of course, if you want a seamless, rod-free look (and a truly stationery curtain), mount the top of the treatment to a block of wood, and drill it to the wall.

Easy, pretty panels!

LinkWithin

Related Posts Plugin for WordPress, Blogger...