This was supposed to be one of those quick and easy posts where I share my latest obsession: those deeply cone-shaped lamp shades that are, apparently, called coolie shades.
Me being me, this somehow turned in to deep research on coolie hats, both the originals and their interpretation in fashion (particularly popular in the 1940s); the term coolie and whether or not it is considered offensive; and the use of said coolie shades by designers (they appear to be somewhat of a signature for John Saldino.)
This all came from the fact that I want one in my new office, and that the latest issue of Veranda seems extra populated by them.
But really, what (if any) of that are you guys interested in?
So here you go, a round up of some lamps currently available, with coolie shades at various degrees sloped. I love how architectural and sophisticated they feel, how they balance out fat lamps and give stature to skinny ones (perhaps this was also the appeal of the hats???)
For sources, (fair warning: none of these are exactly budget options), go to the board here and click through.
Here are some as seen in Saladino's work.
Here are some coolie hats in art and fashion:
And with that, let's call it a day!
Showing posts with label lamps. Show all posts
Monday, March 6, 2017
Obsessed: Coolie Shades
Labels:
decorating,
design history,
lamps,
process
Wednesday, August 20, 2014
Infographic
Love this drawing. It shows how the trend in side table + lamp has changed over the decades, but also illustrates the key point that the total height of the combo remains about the same.
I found this inforgraphic through a google search, but I happen to know that Dina at Honey and Fitz has compiled a number of infographic design cheat sheets, here.
Labels:
design rules,
infographics,
lamps,
lighting
Wednesday, August 6, 2014
Occupational Hazard
I bought a pair of these lamps for that surprise makeover I did, but I didn't end up using them.
Leading up to the install, I had two events at my house, and had to put all the boxes and bags and bedding for the makeover in our guest room, instead of the office (and, well, front hall, back hall, and dining room, per usual.)
My mom came to check out the loot just before install, and when she saw these lamps sitting on the side tables, she said "I actually love those right there." Yeah. Me too.
And guess what? When I returned everything else left over form the shoot, it seems I forgot all about these.....
Of course, this means there are now 7 lamps in a room the size of a queen bed, including the wall lights (remember those?). This just might be overkill. Surely there is a spot for some of the others elsewhere in the house, right?
Tuesday, February 4, 2014
Visual Comfort Lighting at Home Goods
Friends.
If you are in need of lamps, get yourself to Home Goods!
Visual Comfort, probably my favorite lighting line, featuring designs from the likes of Thomas O'Brien and Alexa Hampton, suddenly has product popping up in local Home Goods stores. At around $100 a piece, these are all at the top of the Home Goods price scale, but that's still around the wholesale price--or less. While it's possible that these guys wound up in a discount center because of a quality issue, it is certainly not apparent. My favorite thing might be the tapered shades--you can't pick those up at Target, and buying them at a proper lighting store will set you back nearly the cost of one of these entire lamps.
If you are in need of lamps, get yourself to Home Goods!
Visual Comfort, probably my favorite lighting line, featuring designs from the likes of Thomas O'Brien and Alexa Hampton, suddenly has product popping up in local Home Goods stores. At around $100 a piece, these are all at the top of the Home Goods price scale, but that's still around the wholesale price--or less. While it's possible that these guys wound up in a discount center because of a quality issue, it is certainly not apparent. My favorite thing might be the tapered shades--you can't pick those up at Target, and buying them at a proper lighting store will set you back nearly the cost of one of these entire lamps.
(I want the white ones, above, for myself.)
pretty glass lattice
GORGEOUS royal blue
These remind be of gilded balls of yarn or tumbleweeds. In gold or silver, there were pairs of each.
Very simple, with beautiful marbles bases--again, a pair.
And two floor lamps.
Locals, these are mostly at the Eden Prairie location, though a few are in St Louis Park.
Go forth and shop!
Labels:
deals,
home goods,
lamps,
lighting,
visual comfort
Thursday, November 7, 2013
Loving lately: midcentury inspired lamps
I have been looking at A LOT of lamps lately, and if nothing else, it is reminding me of my penchant for the mid-century thing. Particularly in ceramic (though wood is nice, too), I love the long, graceful necks and the slightly funky proportion.
Today it's making me thing of Naomi's reveal of her one-room-challenge "bachelor pad" over at Design Manifest. Check it out, and check out all the bloggers who participated in Linda's brain child. amazing how fast 6 weeks went...even though I was not actually playing along!
Tuesday, September 4, 2012
Affordable Custom Lighting
Over the past year or two, I've gone crazy for printed lampshades. I made a pleated pair for the guest room (in the same fabric as the headboard), then recovered them in a larger pattern (seen here), and finally added diagonal stripes to a dented shade on a clearance lamp. While I find this to be a fairly simple DIY, not everyone wants to get out the spraymount and wrestle with hot glue and bias tape. I hear you.
So I was delighted to discover that Lamps Plus now has a custom program. I just lost the better part of an hour playing around with it to show you some of the (myriad) possibilities.
Super fun, right? They have ceiling and wall fixtures as well as table and floor lamps and straight up lampshades in the most typical shapes and sizes. You simply select your product, choose a pattern (or solid color), then go about editing the colors to suit your taste. There is a grid of about two dozen "basic" colors, but you can also choose the "advanced" function and choose any color of the rainbow. My major complaint is that the trim options are minimal--typically black, white, cream, brown, and tan, though it varies from shade to shade, and every lamp is trimmed out this way.
I also found that the patterns, shapes, and colors read mostly contemporary--many of today's trendy patterns are represented, including chevron, stripes, dots, trellis, and greek key--though I managed to finagle a couple with a more trad vibe.
Prices ranged from about $60 for a good sized lampshade to a couple hundred for a floor lamp, with most of the fixtures pictured here in the $100-$150 range. To be clear, I have not ordered one of these and can't attest to the quality.
And no, lamps plus had nothing to do with this post--I'm excited by this custom option and thought you might be, too!
Have fun!
Wednesday, January 18, 2012
Lampshade update (diagonal stripes!)
Yesterday I shared a loooooong list of things to do.
Afterwards, it occurred to me that I have also actually accomplished a number of things over the past few weeks that you haven't seen yet.
Like a little lamp update in the girls' room, taking this turquoise lamp from this
To this
Afterwards, it occurred to me that I have also actually accomplished a number of things over the past few weeks that you haven't seen yet.
Like a little lamp update in the girls' room, taking this turquoise lamp from this
To this
Much better.
It is subtle, though a leetle less subtle than it appears in this photo (the combo of pale and bold colors in this room is turning out to be very difficult to photograph).
With all the bold patterns in there, I wanted something soft and quiet, and with floral and ethnic already employed, stripes was the way to go. This is a lovely Ralph Lauren silk that I got for only $12/ yard at S.R. Harris.
Applying it was simple. There are lots of tutorials out there, but I basically followed the two on Isabella and Max, here and here. I did not remove the tape trim at either end of the shade, simply covered it up with the fabic because I wanted a very simple clean edge. I used a tacky spray to attach the fabric all along the shade, then I cut the fabric to about 1/4 inch past the shade, tucked it under and glued it with some dritz liquid stitch.
I love how the stripes are off kilter (because the shade has a slight cone shape, a patterned fabric is not going to stay straight, and a stripe only exaggerates it). Much of this room is symmetrical and very finished; the wonky stripe feels a little more bohemian.
What do you think?
Saturday, July 9, 2011
Small Measures: Whorled lamp
Simple lamp, spray primer. Take liberties with the paint: agate, Florentine paper, oil spill. Or purchase from Arteriors home.
Wednesday, May 11, 2011
SPOTTED: My HomeGoods find In Lonny's office
We all know the distinct pleasure of a bargain find.
And readers of this blog know I have a love affair with HomeGoods lamps. While the quality is not top notch, they just do an amazing job of producing low-cost knock-offs of high end lamps. Some of their lamps seem to be OVER produced, and you see a bunch of them at each store, but every once in a while you see a sort of one-off lamp that is super unique and you wonder how it got there (but first you snap it up.)
Such was the case with my office lamp. I spotted it, had NO clue where I would use it, but grabbed it anyway because I loved it so.
It ended up in the office, where it works because it has a similar color value as the orange Eames chair (i.e. they are similarly bright and clear), and because there's plenty of yellow in the office gallery wall.
The cowhide rug brings in a natural element and grounds all that psychedelic color. (We're working on the desk situation. While I actually don't mind the casual plywood on file cabinets thing, we do need a bit more space, and the room could use a desk with a bit more weight.)
All in all, the office is one of my favorite spaces in our house, even though, in a way, it is the most "unfinished."
It was icing on the cake to get a gander at the new Lonny offices in the latest issue and to spot my fabulous yellow lamp, and to discover just what a bargain I got.
My price tag: $49.99 (on the high end for HomeGoods.) The Lonny lamps? $458. Each.
Did you check out the new issue? What did you think?
And readers of this blog know I have a love affair with HomeGoods lamps. While the quality is not top notch, they just do an amazing job of producing low-cost knock-offs of high end lamps. Some of their lamps seem to be OVER produced, and you see a bunch of them at each store, but every once in a while you see a sort of one-off lamp that is super unique and you wonder how it got there (but first you snap it up.)
Such was the case with my office lamp. I spotted it, had NO clue where I would use it, but grabbed it anyway because I loved it so.
It ended up in the office, where it works because it has a similar color value as the orange Eames chair (i.e. they are similarly bright and clear), and because there's plenty of yellow in the office gallery wall.
The cowhide rug brings in a natural element and grounds all that psychedelic color. (We're working on the desk situation. While I actually don't mind the casual plywood on file cabinets thing, we do need a bit more space, and the room could use a desk with a bit more weight.)
All in all, the office is one of my favorite spaces in our house, even though, in a way, it is the most "unfinished."
It was icing on the cake to get a gander at the new Lonny offices in the latest issue and to spot my fabulous yellow lamp, and to discover just what a bargain I got.
My price tag: $49.99 (on the high end for HomeGoods.) The Lonny lamps? $458. Each.
Did you check out the new issue? What did you think?
Thursday, April 14, 2011
Pleated Lampshade: How to
For the guest room, I knew I needed a pair of wall sconce lamps because the room is too narrow for a pair of bedside tables. Everything I looked at was over $100 a piece, and I just didn't have it in the budget. So I found these simple Ikea sconces for $14.99 a piece,

and turned them into something custom.
Here's the step by step tutorial.
First, let me say that I had never really noticed all the different ways that lampshades get pleat treatments until I was planning to make these over. I was originally thinking of something sort of gathered, not unlike the original Ikea shades, but the fabric I wanted to use (leftover from the headboard) is upholstery weight linen, and it would have gotten really bulky. Then I saw this:

I know, this room is GORGEOUS and there is so much going on and it's kind of crazy to zero in on the pleated lampshade.

But I loved the structure of the box pleat, and the way the spacing allows you to see some flat fabric, too, so I had a plan.
Here's what I started with.

First, remove the binding and the fabric.

Blank slate. Don't worry about getting all those little gummy edges off, they actually help when you add the new fabric later.

Cut your fabric in a rectangle that is the same height as your shade and long enough to wrap the shade times 2. There's no need to cut the fabric on a curve, the way you do when attaching new fabric flat to the shade--the pleats will make the curves work for you. (As a side note, if you want the pleats to lie down very flat, as in in the inspiration picture, working on the curve would probably help.)
To make the pleats, I played around with the fabric to see what felt like a good width with the small repeat, and cut a piece of cardboard to make a guide--in my case, 1" wide. Then I folded a box pleat around the cardboard. I lined the edge of the cardboard up along the center of the pattern to keep my lines straight.

Press in the pleat over the cardboard.

Remove the cardboard and press again.

Repeat. I left about one horizontal repeat between each pleat. With a patternless fabric, you might want to measure. I also re-pressed all the pleats with each new pleat.

Keep pleating until you have enough pleated fabric to go around the TOP of your shade.

Pin both sides of each pleat at the TOP.

Stitch down your pleats, ONLY at the top of the shade.

Starting at the lampshade's seam, glue down the stitched edge of your fabric, lining it up to the edge of the shade. I used a hot glue gun, working in about 2-inch sections.
To finish the edge, I chose double fold bias tape to completely cover the rough edge of the fabric and the shade. Using hot glue again, I glued all around the outside first, then glued the bias tape into the inside. On the first shade, I glued it in sections all the way around, inside and outside, as you actually see here, but that didn't work quite as well. When you get to the seam a the back, fold your bias tape under and glue down.

Use clips to secure while the glue cures. I had these clips left over from some drapery rings that I used with hooks in pinch pleats, and they worked great.

Apparently at this point I stopped taking pictures and decided I was home free.
Next, you want to line up the fabric seam along the back of the shade. I did not fold under my raw edge, but instead masked it with a pleat. Use hot glue to secure the seam.
Repeat the bias tape application on the bottom of the shade. The pleats open up at the bottom to allow for the larger circumference, so the folds will not be perfect. At first I stressed about this and tried a whole different method to keep the pleats really smooth and even, but in the end I think the whole idea is to let them be a bit looser at the bottom. I just added the bias tape and let them fall where they may.
I will admit, the backs of these shades could be a little more perfect, but since they're sconces you don't really see that side. Next time I would measure to make sure the pleats came out evenly and matched up correctly at the back. But that seems like a lot of math, to be honest.
Anyway, hope that all makes sense! I love that I got this total custom look with $14.99 Ikea wall sconces, scrap fabric, and a couple of dollars worth of bias tape. Plus, once I figured out how to do it, I think it only took an hour or two. So I say: go for it!
and turned them into something custom.
Here's the step by step tutorial.
First, let me say that I had never really noticed all the different ways that lampshades get pleat treatments until I was planning to make these over. I was originally thinking of something sort of gathered, not unlike the original Ikea shades, but the fabric I wanted to use (leftover from the headboard) is upholstery weight linen, and it would have gotten really bulky. Then I saw this:

[Elle Decor; Design: Sig Bergamin; Photo: Simon Upton]
I know, this room is GORGEOUS and there is so much going on and it's kind of crazy to zero in on the pleated lampshade.

But I loved the structure of the box pleat, and the way the spacing allows you to see some flat fabric, too, so I had a plan.
Here's what I started with.

First, remove the binding and the fabric.

Blank slate. Don't worry about getting all those little gummy edges off, they actually help when you add the new fabric later.

Cut your fabric in a rectangle that is the same height as your shade and long enough to wrap the shade times 2. There's no need to cut the fabric on a curve, the way you do when attaching new fabric flat to the shade--the pleats will make the curves work for you. (As a side note, if you want the pleats to lie down very flat, as in in the inspiration picture, working on the curve would probably help.)
To make the pleats, I played around with the fabric to see what felt like a good width with the small repeat, and cut a piece of cardboard to make a guide--in my case, 1" wide. Then I folded a box pleat around the cardboard. I lined the edge of the cardboard up along the center of the pattern to keep my lines straight.

Press in the pleat over the cardboard.

Remove the cardboard and press again.

Repeat. I left about one horizontal repeat between each pleat. With a patternless fabric, you might want to measure. I also re-pressed all the pleats with each new pleat.

Keep pleating until you have enough pleated fabric to go around the TOP of your shade.

Pin both sides of each pleat at the TOP.

Stitch down your pleats, ONLY at the top of the shade.

Starting at the lampshade's seam, glue down the stitched edge of your fabric, lining it up to the edge of the shade. I used a hot glue gun, working in about 2-inch sections.
To finish the edge, I chose double fold bias tape to completely cover the rough edge of the fabric and the shade. Using hot glue again, I glued all around the outside first, then glued the bias tape into the inside. On the first shade, I glued it in sections all the way around, inside and outside, as you actually see here, but that didn't work quite as well. When you get to the seam a the back, fold your bias tape under and glue down.
Use clips to secure while the glue cures. I had these clips left over from some drapery rings that I used with hooks in pinch pleats, and they worked great.

Apparently at this point I stopped taking pictures and decided I was home free.
Next, you want to line up the fabric seam along the back of the shade. I did not fold under my raw edge, but instead masked it with a pleat. Use hot glue to secure the seam.
Repeat the bias tape application on the bottom of the shade. The pleats open up at the bottom to allow for the larger circumference, so the folds will not be perfect. At first I stressed about this and tried a whole different method to keep the pleats really smooth and even, but in the end I think the whole idea is to let them be a bit looser at the bottom. I just added the bias tape and let them fall where they may.
I will admit, the backs of these shades could be a little more perfect, but since they're sconces you don't really see that side. Next time I would measure to make sure the pleats came out evenly and matched up correctly at the back. But that seems like a lot of math, to be honest.
Anyway, hope that all makes sense! I love that I got this total custom look with $14.99 Ikea wall sconces, scrap fabric, and a couple of dollars worth of bias tape. Plus, once I figured out how to do it, I think it only took an hour or two. So I say: go for it!
Monday, April 4, 2011
I wish I had a laser cutter
And the skills to make a chandelier like this.
Or even just a floor lamp like this, made out of old album covers.
Love.
Or even just a floor lamp like this, made out of old album covers.
Love.
Thursday, March 31, 2011
The Lamp Factory
I currently have three pairs of lamps in various stages of makeover.
It's no secret that I L.O.V.E. Home Goods lamps. They have a wide variety, they often have pairs (and I love pairs of lamps almost as much as pairs of chairs), and you can't beat the price. Even other mass retailers that I think of as being inexpensive, like Pier 1 or West Elm, sell lamps for about three times as much. Many of my faves from Home Goods look unique, and you would never guess I paid under $50 at a discount store.
However.
For some reason, the default base seems to be that brushed nickel, no matter what the style of lamp. And with gold accents in most of my house, nickel lamp bases just won't do.

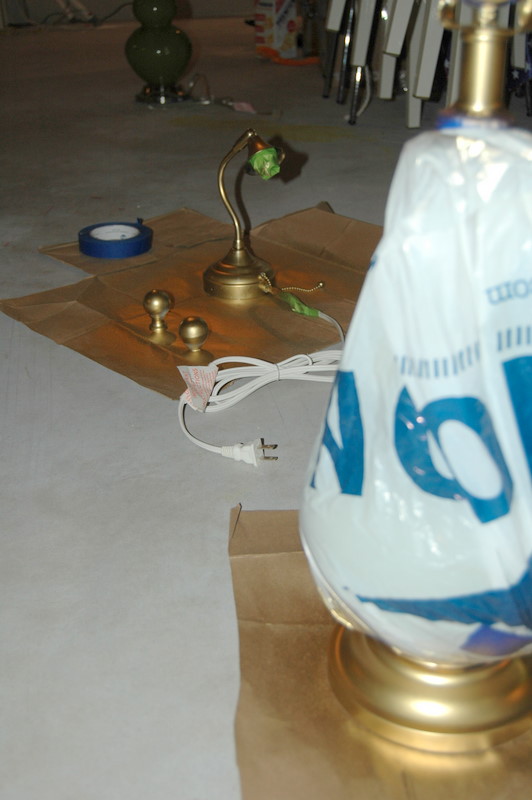
So I've been spraying a couple of them with metallic brass rustoleum. In the un-ventilated basement. (Still too cold to open the windows here!) When the girls and I walked in the back door after school pick up, the house reeked. Oops.
This pair also had mismatched finials, and neither looked like it went with the lamps.
So I got an extra $5 knocked off each one and figured that a matching finish would at least distract from the mismatched shapes. Maybe eventually I'll buy new finials (but I doubt it.)
Pair number 2: ikea wall lamps for the guest room. You can see one in the middle there, also going from nickel to brassy, along with the wonky finials.

(You can also see the legs of a set of 4 white Ghost chairs, all stacked up. I almost sprayed them gold, just by the proximity of that spraying station. That would have been a VERY expensive mistake. Sometimes I'm a total idiot about my projects that way.)
Pair number 3: What do you think about this classic navy ticking to top off these brass stick lamps? The original white shade is feeling a bit stark against the new navy walls.

I think I'll probably go for it. This is the last project for the guest room, and then I can share the results! But at least this is a sneak peek of the wall color. I like it more and more and more and more. And our weekend guests dug it, too.
Oh, and the green lamps back in the living room.
Perhaps the most subtle "after" shot on earth. But much, much better, especially since the frames on the wall RIGHT THERE are black and gold.

Sometimes it's the little things, isn't it?
It's no secret that I L.O.V.E. Home Goods lamps. They have a wide variety, they often have pairs (and I love pairs of lamps almost as much as pairs of chairs), and you can't beat the price. Even other mass retailers that I think of as being inexpensive, like Pier 1 or West Elm, sell lamps for about three times as much. Many of my faves from Home Goods look unique, and you would never guess I paid under $50 at a discount store.
However.
For some reason, the default base seems to be that brushed nickel, no matter what the style of lamp. And with gold accents in most of my house, nickel lamp bases just won't do.

So I've been spraying a couple of them with metallic brass rustoleum. In the un-ventilated basement. (Still too cold to open the windows here!) When the girls and I walked in the back door after school pick up, the house reeked. Oops.
This pair also had mismatched finials, and neither looked like it went with the lamps.
So I got an extra $5 knocked off each one and figured that a matching finish would at least distract from the mismatched shapes. Maybe eventually I'll buy new finials (but I doubt it.)Pair number 2: ikea wall lamps for the guest room. You can see one in the middle there, also going from nickel to brassy, along with the wonky finials.

(You can also see the legs of a set of 4 white Ghost chairs, all stacked up. I almost sprayed them gold, just by the proximity of that spraying station. That would have been a VERY expensive mistake. Sometimes I'm a total idiot about my projects that way.)
Pair number 3: What do you think about this classic navy ticking to top off these brass stick lamps? The original white shade is feeling a bit stark against the new navy walls.

I think I'll probably go for it. This is the last project for the guest room, and then I can share the results! But at least this is a sneak peek of the wall color. I like it more and more and more and more. And our weekend guests dug it, too.
Oh, and the green lamps back in the living room.

Sometimes it's the little things, isn't it?
Subscribe to:
Posts (Atom)