
The idea: Two days (of my time), a small budget (of their money) to spend at local retailers, and a little bit of elbow grease can yield a remarkable makeover. Ready for the proof?
Enter Lisa, a friend from grade school. She and her husband swapped rooms with two of their daughters (they have four fabulous kids) but never painted over the "Cinderella Blue." They bought a bedframe and filled the space with hand me downs. Functional, but not exactly a soothing retreat.

As so many of us do, Lisa and Dale fulfilled the needs in this space as they arose, without an overall design plan. A TV was propped on a pair of (non working) speakers, on top of a small side table. An old cabinet was pressed into the corner to hide its unfinished side.

One piece of an old sectional was crammed in another corner, and Dale started hanging his caps on the wall hooks left over by their daughters. (I am guessing that Lisa would like you to know that this photo was taken mid-project, and that all the extra stuff in this picture is makeover material.)

A hand-me-down dresser got a coat of black paint, but the sloping ceiling of the attic room meant the mirror had to sit off center.

The biggest problem (and its common in these converted attics) was just how unbalanced the room felt. The open stairwell split the room and almost everything was in the large half.
But the room was nice and big, and Lisa had a number of great pieces to work with. Don't you just love POTENTIAL?
Thursday morning, I arrived to check things out and discovered that the room had a larger challenge than I had realized from the photos: large scale panels along both long walls concealed storage, and needed to be left relatively clear for access (you can see one next to the dresser in the photo just above). Holy space planning challenge! After a bit of rearranging, we found the right spot for the bed--nestled between two storage doors--and everything else fell into place.
Ready for it?
Ta da!

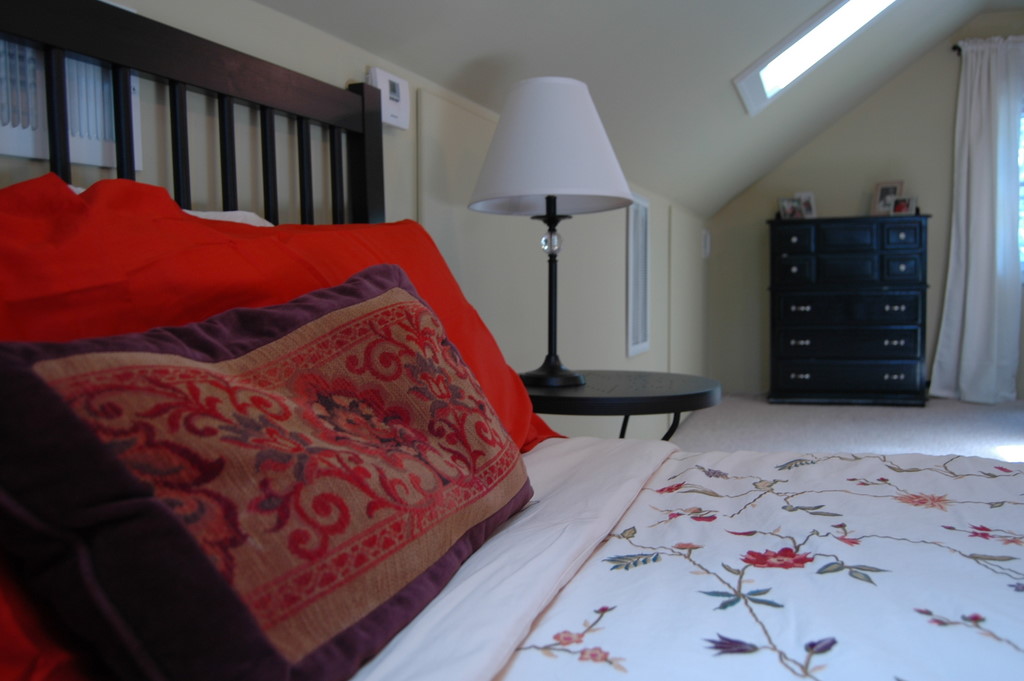
Moving the bed to the side wall opened up the window and balanced out the long, narrow room by moving the most massive piece to the center. We were then able to place the lowboy dresser on the far wall, and balance it with the sectional piece. (there were actually other armchairs available in the house, but nothing would fit up the stairs!) A pair of velvet throw pillows and a brown chenille throw balance out the sectional, and the placement makes you overlook it's armless side.

The dresser had a matching tallboy, which came out of the closet and took up residence at the far end of the room (essentially facing the lowboy). The vertical shape is a much better fit for the narrow wall, and the surface is a good spot for frames photos.
White curtains with a quilted floral motif soften both windows and make the far end of the room feel finished. Black cafe rods hung high heighten the tallest part of the room, drawing the eye up and de-emphasizing the sloping walls.

How pretty is this duvet? Lisa already had it, and it set the color palette for the room. The softer green paint instantly brightened the room, making it feel much bigger and airier, and a satin finish blurred the edges to make the walls recede, whereas the old semi gloss (washable, for kids) highlighted the surface of the walls, drawing them in.

The corner that previously housed the sectional got a proper entertainment unit, which is tucked out of sight upon entering the room, and provides storage for books, remotes, and odds and ends.

And the bed got spruced up with a bright orange accent on the shams. Pairs of side tables and lamps lend balance, and their round shapes break up all the blockier pieces in the room.
Not bad for two days and a couple hundred bucks!
So, where did we spend our money?
Paint: Behr "Outback," $52.00
Curtain Rods: Black cafe rods from Target, $10 each
Everything else, Ikea:
Bedside tables, $20 each
Curtains, $40 each pair
Oval Mirror above dresser, $10
Pillow shams, $6 each
Baskets, $5/ set of 3
Total: $219
Okay, and then Lisa cheated. We were planning to use a media stand from her garage, give it some spraypaint, new knobs, and wallpaper the glass doors, but she decided it was too short for the space. Another trip to Ikea (unbeknownst to me) yielded a 100% perfect media stand in the As Is department. So that basically doubled the total to $400 (ish).
Still, not bad.
So again, the before:

And after!

(Three notes on the photos: we couldn't find the appropriate hardware to mount the oval mirror, which WILL hang on the wall; the square artwork across from it will be replaced by a framed photo of Lisa's kids, and there is a painting that belongs on the wall above the stairs. I'm impatient, what can I say?)
Local (Twin Cities) readers, if you're interested in a Two-Day Makeover, you can email me at heather@heatherpetersondesign for rates and more information.
Ha! Good job, Heather! Both on the project, and on the blog! I can't believe that's MY bedroom - COMPLETE transformation! THANK YOU!
ReplyDeleteWow! It looks so beautiful! Heather, I'm a friends of Lisa's and I'm going to call you as soon as I get some elbow grease stored up. My upstairs needs this.
ReplyDeleteWowwie Kazowie!!! Yippee! The King and Queen have a proper suite. LOVE your new bedroom, can't wait to call Heather for mine. :)
ReplyDeleteAmazing. I can't believe that is the same room.
ReplyDeleteWhen can you come to my house to do my 8 year olds room? Let me know!
Erin STeinlage
612-824-9413
I got to see the new room in person today. Beautiful! Bravo to you Heather. It is lovely.
ReplyDeleteBRAVO! This is an entirely new room! And your budget is beyond admirable. Well done, indeed! I bet this Mom and Dad will be finding lots of excuses to lounge out in their new retreat....
ReplyDeleteAmazing transformation!
ReplyDeleteWeel done, Heather! I love the cozy aspect of attic bedrooms, but the previous blue was a bit dark and too cold, the color you chose has done this space justice. What a difference moving the bed made! Really great makeover.
ReplyDeleteSo lovely! What a peaceful space you created. I love your enthusiasm for budget decorating!
ReplyDeleteWow! what a great space you created! They must be thrilled. Moving the bed was the perfect decision, but I also really love the serene wall color.
ReplyDeleteAbby