Showing posts with label reader design dilemmas. Show all posts

Friday, August 1, 2014

Reader design dilemma: Working with a traditional red couch

Nicky writes to me with this dilemma:

"I am stumped and can't find anything online (including pinterest/ mod boards) to give me direction for this crimson couch.  Red always seems to be the accent color, not the statement piece!  I love the looks of Pottery Barn and modern farmhouse style."

Here is what she is working with:


Nicky has some great pieces to work with and a clear direction, but so far the space is really only half decorated.  The first thing to do with a piece like this couch is to accept it.  No use fighting it, right?  Luckily, the lines work great for Nicky's intended style.  In such a small space, I would keep a tight palette to work with the couch, and bring in interest through shapes and textures.

First up: wall color.

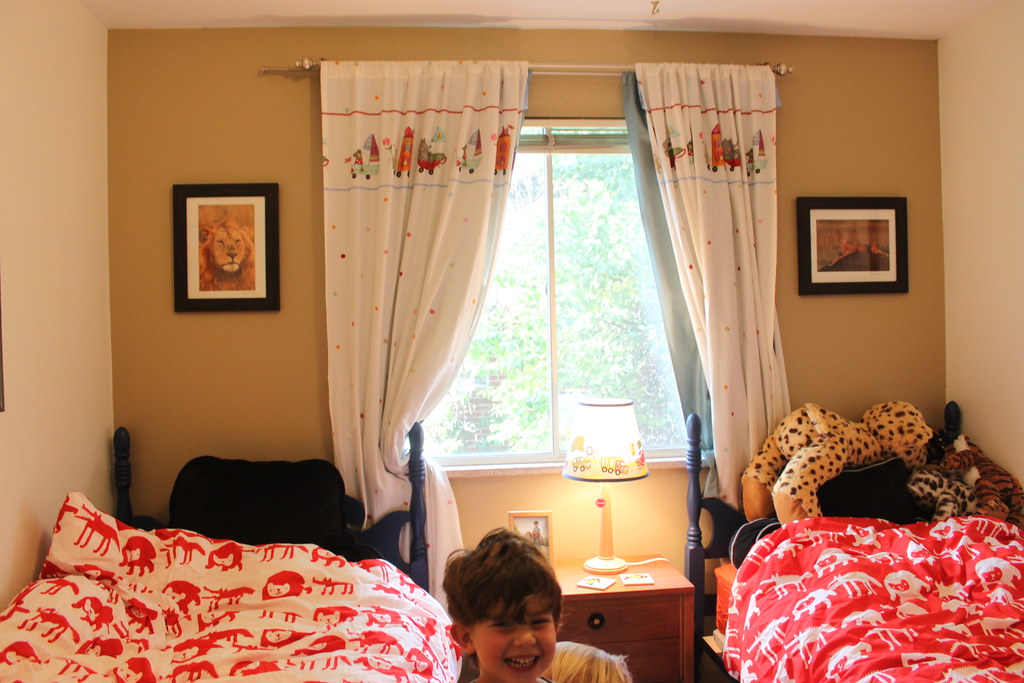
Nicky is not loving the yellow, and while I agree it is a little too much with the couch, I think she is on the right track.


Working from the diamond pattern in the couch fabric, and coordinating with the existing carpet, I would choose more of a warm beige or ivory.   I would just be careful that it did not match the carpet exactly--go  a little darker or lighter to create contrast.

Benjamin Moore Creamy White

Next up: Window treatments.

To connect the two rooms and bring some balance, I would do floor-length drapes in both spaces.  Some people shy away from drapes in an eating area, but if you hang them just off the floor they should not get gross.  I would hang linen drapes in a neutral color, something that becomes tonal with the walls.

Finally: Let's bring in some furniture!

This look feels most appropriate to Nicky's style and current lifestyle, with two small kids in the house.  A Pair of leather club chairs and weathered wood tables will simply patina with use, and bunching tables plus side tables are all moveable, creating flexibility for littles who may want to play on the floor.  The palette is really limited, but leather plus cowhide plus copper plus iron plus weathered and whitewashed woods = totally interesting.  There is also a little beaded motif running through, with the nailhead trim on the leather "B", a bead detail on the white drum table, and a perforated look to the copper lamp.


Later in life as the kids grow, Nicky could graduate to a more elegant and traditional space, while still sticking with the same tight color palette.  A wing chair, turned side tables, and armless slipper chairs are all classic and elegant, and the blanket-stripe rug and block print art keeps it from getting too formal.


OR!  How about going the other way?  I noticed that Nicky has some suzani-looking pillows on her couch, so even though she has self identified as modern farmhouse, I thought I would throw a more global-loving, cozy English look in there as well!  Suzani rug, super tufted chairs, a well-traveled trunk, mismatched bamboo tables with elegant ceramic lamps....you know I love this look.  :)

For more inspiration on how to let a red sofa shine, check out this recent post on Sadie and Stella.  Changes the way you think about red, doesn't it?

Hope this helps, and have a great weekend!

Monday, March 18, 2013

Reader Design Dilemma: Black in a girl's room

I recently got an email that went a little something like this:

I have a perfect Reader Dilemma for you: The kids decided to switch back to each having their own room, and my 5-year-old is over-the-moon excited about painting her room BLACK.  Right now, it's the perfect shade of age neutral green.  Her idea is that if the room is pitch black, silver stars would show up better.  Do I let her do it, or talk her out of it?!

The reader was taken aback when I said, Do it!

Here's how:

Natural


Take the edge off the black with lots of natural tones and natural materials:  an antique pine dresser; linen headboard, lampshade and curtains; woven rattan swing chair; and sisal or jute rug.  

Then add in some modern shapes, like a simple round mirror, a geometric white lamp, and a retro-modern flushmount fixture (the little perforations mimic the stars on the ceiling).

To make it fun and youthful, add color and whimsy in bedding, accessories, and art.


Bold


As another tack, double down on the boldness of black walls with graphic patterns and strong solid colors.  

Make sure you mix static patterns (stripes, ribbon trim, chevron) with those that have movement (the star wallpaper on the ceiling, the floral bed and floral elephant print).

To keep it from getting too crazy, take your palette from one print (in this case the bed fabric), drawing a couple of the colors out in solids (pink chair, chartreuse lighting).

Finally, keep the shapes simple and streamlined, and keep it real with one or two natural materials--here, the flokati rug and wood dresser.


Romantic


Finally, for the girly girl, a different kind of drama.  Instead of stars, use a gold leaf pen to draw constellations on the ceiling (think grand Central Station), then repeat glamorous gold around the room (mirror, chandelier, throw pillow, accent table.)

Match the drama of black with dramatic pieces, like a four poster bed, overdyed rug, and black velvet chairs.

Ivory bedding and curtains with voluminous ruffles break up the darkness and add more than a dash of romance.  Tie it together with little details: the black edge to the curtains, the stars falling in the background of the art nouveau print.

Have I convinced you?  Would you dare try black walls in a girls' room?

If you want another blogger's take on black--in a nursery!--check this out.

Tuesday, January 15, 2013

Reader Design Dilemma: Follow up

Quite some time ago, I posted some ideas for Amy for her boys' shared room.

After the post, we took the conversation off line, and somewhere along the line I showed her images of Cole And Sons Woods wallpaper.


Being an amazing artist, Amy went ahead and found a stencil in a similar vein to completely transform the space.

Before:


After:


(Don't you love her little "bats"?)

They moved one of the twin beds inside the closet to open up the floor plan.  I love this as an example of breaking rules to make your space work for you.  They needed the floor space more than the hanging space, so why not?

Amy also stripped and refinished the painted dresser (seen in the closet in the "before")


Much better, right?  IT also works especially well with one painted finish in the room (those blue beds) to have a stained wood finish as well.  Loving the make-unders these days!

This is one busy mama.  doesn't the space look like it is coming along nicely?

(If you have a design dilemma and want some friendly advice published here, email me!)

Tuesday, May 29, 2012

Reader design dilemma: Balancing oversize furniture

How was your weekend?
Why is it harder to come back from a three day break than a full vacation?
I actually did a good job of unplugging this weekend.  Not much computer time, no work stress.   I need to do this more often.

But we are back today with a design dilemma.

Nowadays, we all have a lot of stuff, and if you live in an older house there isn't always a ton of built in storage. A reader writes in that she bought a number of dressers for a master bedroom that turned out to be bigger than expected.  She needs the storage space and returns on furniture are expensive, so she wants to work with them.  Because of the layout of the room, all three dressers are on one side, across from the king sized bed.

What she needs is BALANCE.

Here's how to get it:


Option 1: Use furniture
All that furniture on one side of the room is most easily balanced by more, right-scale furniture.  Swap out one of the three dressers for a pair of bachelor's chests which double as nightstands.

Option 2: Use color
If furniture is not an option, two pairs of panels in a heavy fabric (think lined velvet, not sheer silk) and a darker color will give plenty of weight to this side of the room.  Keep existing night tables.

Option 3: Create architecture
Prefer to keep the colors light?  Add valances or pelmets and trim them out with ribbon or trim for an additional sense of architecture.  Fake a bigger window by extending the valances a foot beyond the window frame on the outside of each window, and create a curtain with double fullness.

Instant balance!

Got a design dilemma of your own?  Shoot me an email at heather [at] heatherpetersondesign [dot] com


Wednesday, February 1, 2012

Reader Design dilemma: Living room with no solid walls

Many older homes were built for a different kind of lifestyle--and different scale furniture--than we have today. One of the biggest challenge I encounter is how to make these spaces work for life as we know it.

Steph wrote to me with a major space plan dilemma:


What do you do with a room only 10 feet wide, with an entry door, a staircase, a big fireplace, and two large arched entryways defining its walls?  Both the dining room (above) and the den (below) open off this space, but right now this is a lot of wasted square footage, and a very awkward set up with the TV across the room and at an odd angle to the couch.


From the living room and family room, Steph and her family need:

- a conversation area
- toy storage and playspace for two kids
- a place to watch TV

Let's tackle the conversation area first.

With no solid walls, the only choice in the living room is to float an arrangement in the middle of the room, and the 10 foot width of the room limits choices to chairs or loveseats.  An arrangement of four chairs around a coffee table is one possibility, though I think I would go for a facing arrangement.

Options 1: A pair of 60" loveseats, like we did in this home of a similar vintage, in New Jersey.  Armless loveseats, like the one below, are particularly useful for keeping things open.

Jul/Aug 2011
Design by Lonny, in Lonny

Option 2: A loveseat and a pair of small scale chairs.  I like the use of these shell chairs here: they don't take up a lot of visual weight, and they are literally light, making them easy to move around the room.

Nov/Dec 2011
Paul Caddell, Lonny Mag

Options 3: A loveseat and a daybed.  Daybeds are great for a conversation area (less so for watching TV), and make a wonderful play surface for the kiddos.  And again, the armless/backless scenario means that it won't stop the eye, making the space look bigger.

Jan/Feb 2011
Jarlath Mellett in Lonny

Or, surprise option number 4, a loveseat and a pair of upholstered ottomans or benches.

Oct/Nov 2010
Celerie Kemble, Lonny

In any of these scenarios, go for an 8 x 10 rug to define the seating area, and a couple of small and lightweight occasional tables that can be moved wherever they are needed most.

Now let's kill two birds with one stone.
Moving the TV from the corner by the fireplace into the family room both opens up ample space for kid storage (shelves or closed baskets), and takes the TV watching out of the mail living space, tucking it into a cozier corner.


In the family room, I would swap out that couch for one just a few inches shorter, to keep it contained in one room, and mount the TV on the wall where the tall bookcase is.


In the fireplace corner, I would move those tall shelves from the family room, and tuck a small round table in front of it for drawing.

Bonus space
Believe it or not, there is still space for a little sumpin sumpin in front of the radiator at the far end of the living room.  Depending on need, this could be a slim desk with tuck-under stools, a chair in the corner for a reading nook, or a buffet for the adjoining dining room.  Whatever the case, I would hang floor length curtains to soften the window and bring height to that end of the room.


So, what do you think?  Can you see it?  How would you tackle a space like this?

pssst.  Have a design dilemma?  Email me at heather@heatherpetersondesign.com.  Let's talk.


Thursday, October 13, 2011

Reader Design Dilemma: Combining paints and stains in a boys' room

Amy writes to me with a problem that I think is common these days.

In her boys' room, she has second hand dressers and beds.  They all have great lines, but she wonders what she should paint and what she should sand down and re-stain.  With all the DIY up-cycle action going on out there, I think lots of us can relate.  I think there's a thing that happens when too many items in a room have been messed with.  Some kind of DIYitis.  It's all about knowing when to stop.

A couple of decisions have already been made for the small room, which helps to limit the seemingly endless possibilities when it comes to customizing your pieces.  Amy has this adorable red and white animal silhouette bedding from Ikea (I love that it's reversible so the two boys can have a same-but-different look).  She has also promised her 4 year old that the accent wall will be painted orange.


The closet doors can't function properly with the bed placement, so they need to be left bare or replaced with curtains.  Since it's the first thing you see when you enter the room (the image below is hsot from the doorway), curtains are the way to go.


And finally, Amy's husband does not want to paint the bed frames white.

With two bold colors already in the plan, the goal is to work out a room that can stand up to the highly saturated colors and bold shapes, without, as Amy says, looking like a circus.

While the options are nearly endless, I like three directions.

1.  Bold and Sharp
A healthy dose of crisp black and white stands up to the red and orange.

Dakota and Noah's Room
Painting the bed frames a semi-gloss black makes them stand out against the orange wall (bonus: use spray paint), while painting the dresser orange brings that bold tone to the other side of the room.  Mostly white curtains give some relief against the accent wall, and horizontal striped curtains on the closet carry the bold scheme to an otherwise all white wall.  Soft baskets to corral stuffed animals add a needed organic touch while repeating the black and white scheme, and the alphabet art brings just a touch of red and a tonal grey to the walls.  With this scheme, I love the idea of painting the inside of the door with chalkboard paint.

2. Build a natural base
Stripping and staining the beds and the dressers in one cohesive tone makes warm wood a major feature in the room. With wood as the base, there's more space to play with a mix of colors and pattern, and adding navy to the orange and red mix feels classic.

Dakota and Noah Version 2
I like the mix of three different navy and white patterns--the stripe curtains for the closet, gingham or buffalo check at the windows, and stars on the lampshade--to keep it from looking too matched, and the art carries the red from the bedding to the walls.  The art, like the bedding, is all about line and silhouette, but this is balanced by the natural elements, including the organic weave of a nice big basket for toy storage.  That shiny orange lamp brings our accent wall color across the room.

3. Go tone-on-tone around the room
In such a small room, it's no surprise that Amy doesn't want to paint all of the walls orange.  But a consistent paint treatment around the room can make a space feel larger.  By using a softer neutral two thirds of the way up the wall and topping it off with orange, Dakota gets his bold color but the room doesn't go into overdrive.  I would not use molding here--just tape precisely and the effect is much more modern and streamlined.

Dakota and Noah 3
In this case I would use either grey, as shown, or a green on the olive to khaki spectrum, and paint the beds one tone darker than the walls for a tone-on-tone effect.  Then the key is to keep it streamlined, with wide-striped panels in the same neutral base plus white on both the windows and the closet door.  Bring the orange back on the dresser for a color-block effect, and add roller crate storage for a natural, rustic touch.  (Added bonus: the crates can slip under the beds when not in use.)  With the color block being the main motif, the art needs to be softer and more realistic than in the other looks.  A black and white portrait of each of the boys above his bed, framed in red (or wood), is just the right touch, and a wall sconce from ikea over the dresser has an organic feel, like tentacles, breaking up all the blocks.

One more thing.

Dina over at Honey and Fitz recently rounded up some of the best dresser transformations around the web.  How amazing is this ship cutout?


Did I mention that our reader Amy is an artist?  Well, she is.  I wouldn't recommend this for just anyone, but I know Amy could pull off a dresser transformation along these line, and the room is so small, each piece could be considered a statement.  She would choose a motif meaningful to her family, but this gives you the sense of it.


What do you think:  Do you have a favorite?

Amy has her work cut out for her, but hopefully this helps her pull together a vision to work towards.  I had so much fun putting this together!

Do you have a design dilemma that I can help with?  Email me at heather{at}heatherpetersondesign{dot}com


Tuesday, August 2, 2011

Reader Design Dilemma: Mixing other rugs with zebra hide

The maid of honor from my wedding just happens to be gut-renovating a 4-story brick corner townhouse in Jersey City.  I just happened to stay there on my recent City visit.  We just happened to talk (and talk, and talk) decorating.  It just so happens that this friend, Marni, and her husband Matt were on a Genevieve show on HGTV, though for some reason her episode is not available online.  HGTV, throw a sister a bone and get this episode up for me to see.

Here's the backstory.  The house is only 16 feet wide, leading to a number of design dilemmas.  On the parlor floor, the space is open plan, with living room and dining room sharing space front to back, and a (gorgeous) kitchen up two steps behind that.  Each of the living spaces has a non-working fireplace is grey-washed brick, with a small hearth.  In order to fit a full-sized couch in the living room (this to-die for specimen, in black leather), it had to overlap the hearth.  A rug as wide as the sofa would cover up the hearth and encroach on the fireplace's space.  (In the colloquial, the rug would be all up in its grill.)  This combined with the fact that Marni has always, always loved black and white stripes in general and zebra stripes in particular, the answer was clear.  A zebra-printed cowhide (thanks, West Elm) will have a lot of presence in the room, but the irregular shape will work around the floor plan issues.

With the open floor plan, Marni was wondering what in the heck she could put on the floor in the dining area that would stand up to, but not fight with, that zebra hide.  Naturally, I had a few ideas for her.  In each of the boards, I'm showing Marni's existing chandelier, fan, dining table, couch, and side table.  Some pieces (coffee table, case goods) and layered details (art, accessories) are missing, obvs, but I'm throwing out some options for the big remaining purchases: dining chairs, rug, and living room armchair.

First up: Go tonal, but equally bold

marni 2

The grey and white of this rug is tonal to the black and white, and the bold, overscale diamond can keep up with the graphic pattern of zebra stripes.  Throw in super bold color on your chairs, and you're all set.  Kapow.

Numero Dos: Deep color, strong pattern, chrome finish

Marni 3

Here, the strong color and pattern of the rug stand up to the zebra, but everything else goes tonal, with acrylic chairs that practically disappear and a modern classic panton chair in metal-finish base and magenta fabric.  Glam rock.


Third time's the charm: Loose pattern grounded in black


Marni


Here, rather than a bold graphic pattern, I suggest something looser, more organic.  While zebra is striped, it is the most organic stripe around.  I let the lavender color take center stage and paired it with modern white leather chairs with warm wood legs and brought the sense of detail, whimsy, and femininity into an armchair with swirled arms (yes, that's the technical term), turned legs, and a slew of nailhead.  This feels like the most "subtle" version to me (if you can call a room with a zebra hide "subtle"), or perhaps I mean "refined."

So what do you think:  if this was your house, which scheme would you choose?

I'm having a lot of fun helping Marni with this fabulous project.  Hopefully we'll post some results here and there as progress is made.  Enjoy!

Friday, July 1, 2011

Reader Design Dilemma: Recalled Crib

Rachel writes to me with a recalled crib.  She doesn't want to use it as a crib or donate it (for safety concerns), but she also thinks it's kind of wasteful to kick it to the curb.  Instead, she'd like to repurpose it.  Here's the crib:


Sort of standard issue, in natural.  (and pictures online are apparently available in two sizes: teeny, and tiny.)

My best idea for this is the most obvious (sometimes the simplest solution is best, no?).  This is a convertible crib, which means it is built to also function as a daybed.  Like so.


I would make a few little alterations and use this, daybed style, as a little kiddo couch.  Cut down the legs, ditch the bumper and replace it with some cute graphic throw pillows, sew a slip cover for the mattress, preferably out of ticking, or make one of these custom boyos a la Lauren Liess's window seat in the DC show house (I love that she stacked three.  So Princess and the Pea),


Or use a pair of floor pillows like I did in my stupendously amazing graphic design job of a mock up

Day bed

(I know, you're super impressed).  Or, heck, just use a cute sheet.

You could put it in a little nook with book bins or a wall mounted book shelf nearby.  Maybe a clip on light on the higher part of the arms.

But maybe Rachel has already thought of this, and would like a little more.

Hoe about turning it into a playhouse?  Kind of like this:


I would use the crib, again, in daybed mode, suspend a hoop from the ceiling, mosquito net style, only instead of netting use some burlap or cotton duck (you know, cheap and durable) and drape it over the side arms, kind of like this.


Or this


(Hey look: ticking!)

Or this (only sideways).


Now, i wouldn't go that themey in an actual bedroom, but how cute to have cowboys and indians fabric, especially if you let it drape over the whole bed,  teepee style?  Like a blanket-and-chairs fort, only better.

Not doing it for you?  How about taking the casters off and using it as a gated step stool in the kitchen.  Like one of these.


Now, I have to admit, these plans are not feeling very creative.  So I did some looking around the interwebs, and I found LOTS of repurposed crib project.  The best round ups are here and here.  Here's the thing, though.  Lots of the projects I came across used pretty spindles from a Jenny Lind-style crib to create all manner of things: table legs, a plate rack, a bench.  Or they use the metal springs from the base of the crib, which, I'll come right out and say it, I am totally against.  This Alpha Crib just isn't that interesting, and I actually do think it's best value is in using it as a whole, not breaking it down into plain old slats of wood or other parts.

Which brings me back to my simplest, obvious solution: daybed toddler couch.

Well.  You guys are more creative than I am.  Anyone out there have a better idea?  Please share it so we can pass it along to Rachel!

Thursday, June 16, 2011

Reader Design Dilemma: Repurposing a media unit

First, let me say how much I love hearing from you guys--keep your design dilemmas coming, they keep me sharp.

Lauren writes to me as she and her husband move from a one bedroom apartment in Murray Hill, Manhattan, to a two bedroom in Gramercy Park.  For now, the second bedroom serves as an office for Lauren's booming events business, Bellafare, as well as hosting guests, as needed.  Their old media unit, the Logan Suite from Pottery Barn, doesn't work in their new living room, so she's looking to repurpose it in the office.  Only problem: what to do with the middle bit, where a TV clearly goes?


As I understand it, this unit is modular.  One option that could be pretty seamless: remove the TV stand and tuck the bed right on in there, kind of like this.


At 54" wide, a full sized bed should just fit.  To keep the set up from looking like one of those terrible 80s headboard shelf contraptions that are always showing up on craigslist, I would keep the shelves very styled with a mix of objects and guest-friendly books, and consider wallpapering the backs of shelves and painting above the bed in a coordinating color.  Cute. no?

Another possibility, and perhaps more realistic: to turn the TV stand into a bench.  Lauren wrote that she's inclined to this idea, but I would take it one step further than a simple seat cushion and go ahead and upholster the back.  This is straight out of Candace Olsen's playbook.


(Do you watch Candice Tells All?  This is a screen shot from a recent episode.  You can watch full episodes on HGTV.com, and while the interiors are not always my favorite, I like that each episode focuses on a design principle like "flow" or "rhythm.")

But I digress.  See the brown bench?  that's a black quilted-leather upholstered wall behind it, in the niche.  That's kinda what I'm talking about.

To do something like this, cut a piece of plywood the size of the opening (from bench to bridge), and cut 1" or 2" foam to match.  Adhere the foam with spray adhesive, drill holes for tufting, upholster, and attach to the wall.  )Basically, you're making a rectangular headboard).  Have a cushion made in a matching or coordinating fabric.  A variation on the theme: cover a number of wood "tiles" in matched or mixed fabric to create the same effect, and attach them to the wall with industrial velcro.  (Like this wall in a Muriel Brandolini room--though, to be clear, I would just use one fabric).

Either way, this will look much more built in and custom than a bunch of throw pillows, and will be comfortable enough that guest might actually sit here to put on their shoes or peruse the travel books you've left out on the shelves.

Lauren, hope this helps--let me know what you decide to do!

Monday, June 6, 2011

Reader Design Dilemma: What to do with a brick planter entry divider

Renee writes to me with a fun dilemma.  I'm going to give it to you in her own words, because I think she captures that feeling we all get when a built in element has us stumped:

So there's this thing in my house. It's a brick thing at the front door, sort of delineating the world's smallest foyer from the (also small) living room the door opens into.  I generally love it as a 60's element, I love the color of the brick and now that my kids aren't toddlers it's not as hideously dangerous as it used to be. But what do I DO with it?


Check it out:


My first reaction, to be honest, is that I kind of like it.  But Renee says that this is where plants come to die, and I know that if this was in my house, it would immediately accumulate keys, mail, bags, and Disney princess dolls.

Option 1--and Renee alluded to this idea--is to make it a bench.  At 22" tall, it's about 4" higher than a standard seat. and adding wood on top would just add to that problem.  To make a bench that looks like it came with the house, I would see if the top stone slab could be removed, and replace it with a 1" thick piece of wood with a nice grain in a stain to coordinate with the wood trim.  A 2" thick slab of wood would be in better proportion, but then there's that height issue again.

Option 2: build it up to create a room divider, better delineating the entry from the living space.  To keep it feeling authentic to the house, built in 1962, I would look to a geometric treatment.  Here's some inspiration:


I'm a big fan of this one, because it would echo the horizontal pattern of the brick, and the dowels could make for fairly easy construction while keeping things open.  Now, if Renee didn't want to physically connect the screen to the stone base, today's lightweight materials would allow for a screen hanging from the ceiling, like this:


Though, to be clear, I would stick to a pattern like the one above.

To add a layer of function, the divider could be built out as very narrow shelves, like one section of this guy:


This would provide space for the aforementioned keys, maybe even an objet or two when the kids are a little bit bigger.  Wouldn't this be pretty in a woodstain with some sweet little 60s glazed vases in the openings?

If these options feel either too closed off or too difficult to build, I would consider something with very simple lines.  A horizontal wood slat feels true to the period, but allows the builder to choose just how much space to leave between slats.  Horizontal would be nice:


And, really, so would vertical (love the connecting pieces in this one)


And then there's the possibility of a rope wall.  I spotted this one over at the Brick House, and I love the sort of rustic simplicity of it.  If you check out the blog, there are even basic instructions for the construction.


Problem solved, right?  Well, there's one more issue.  What do you do with that planter?  With the narrow shelves, and the rope wall, the base piece of wood could cover over the planter opening as if it never existed.  Both treatments are open enough on the sides that they wouldn't need to interfere with the light switch on the wall.  The other screens are trickier, because they don't have bulk at the bottom to cover up the hole, while the slatted walls would run right into the lightswitch if they were built down the middle of the stone.  In those cases, I say hang or build them behind the planter (on the living room side), and keep something leafy and green going simultaneously.

What do you think?  what would you do with this brick divider if you really loved it and wanted to make it work?

Renee, I hope this helps!

If you have a design dilemma and would like some help, send it my way at heather[at]heatherpetersondesign[dot]com


LinkWithin

Related Posts Plugin for WordPress, Blogger...